Your Storable Edge software provides the ability to create your own documents, letters, notices, and forms, or upload existing documents using the Document Editor. Then, associate the document with a specific action such as move in, move out, transfer, or delinquency. When those actions are completed by you or automatically by the software, the document will be generated with the tenant and unit information and will be available for you to print or email.
Navigate to the Settings tab in the Corporate section of your software. In the lower right corner, select Letters under the Documents heading. From there, click the Templates tab.
Using the document editor
Before editing and creating new documents, it's useful to understand the replacement fields that are a part of your document editor.
Replacement fields pull in information from the system and populate the document with specific information. These fields function as markers for information pertinent to the recipient of the document and are automatically replaced with that information at the time of the selected action or event. For example, a lease document can be added to the move in process. If you place the replacement field of [[unit.name]] in the lease, then the unit number the tenant is moving into will appear in the lease.
Replacement fields are organized into a table on the Document Editor page for your facility documents. This table is divided into several categories. Clicking the expansion arrow beside each category will expand that section and show you all of the available replacement fields in that category.
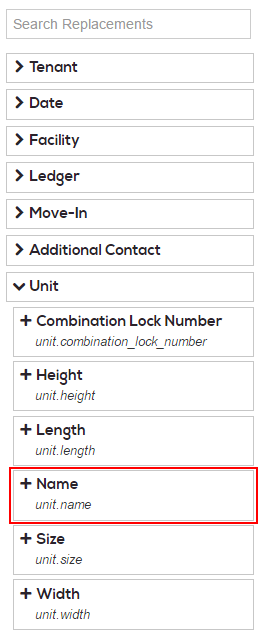
To place a replacement field in a letter document template:
- Locate the desired replacement field in the categorized list
- Place the cursor in the document editing window in the place you wish to add the replacement field
- Click the replacement field (denoted by a + next to the name of the field, such as + Name)
The replacement field will be automatically formatted and added to the document or email template.
To remove an unwanted replacement field, simply delete it from the text or click Undo at the top of the editing window.
Customized Templates
To create a new document:
1. From the Templates tab of your Corporate Letters settings, click + Add new template. The Document Editor will open with a new, blank document.
Note: To avoid starting from scratch, you can even begin with a default template.
2. Enter a title for the document in the Description field.
3. Select a template Type from the Type dropdown menu.
⚠️ Only one document can be set up with Lease as the type. If you create other supporting lease documentation, please use Other as the type to avoid issues generating documents at move-in.
4. Click Select Action to show a list of available actions and events that can be used to trigger the document to be generated. Click the X next to the action or event to remove the document from it.
5. Begin typing your letter, notice, form or document into the editor box. Utilize the formatting tools at the top of the editor box to make common styling choices. Add replacement fields to the document as needed.
6. Preview your document by clicking the Preview tab in the upper right of the editor box.
7. Once you are satisfied with your document, click the Save & Exit button.
Ad hoc documents
An ad hoc document is a document that is not associated with any action or condition in your software. Designating a document as ad hoc means that it will not be populated for any reason by the system unless you take an action to populate it yourself. Many facilities use ad hoc documents to update their tenants about maintenance issues or marketing promotions.
To create an Ad hoc document template, click Select Action and select Ad hoc from dropdown menu.
Uploading Existing Documents
To upload a letter document:
- From the Templates tab of your Corporate Letters settings, click + Add new template. The Document Editor will open with a new, blank document.
- Enter a title for the document in the Description field.
- Click Upload File and select your document from your computer. Supported document types are: txt, xml, doc, docx, odt, rtf, html. PDF documents cannot be uploaded.
- Click Select Action to show a list of available actions and events to which you can attach the document. Click the X next to the action or event to remove the document from it.
- Make any necessary edits to your document in the editor box. Add replacement fields to the document as needed.
- Preview your document by clicking the Preview tab in the upper right of the editor box.
- Once you are satisfied with your document, click the Save button.
Saving a new or copied document as the primary document to a selected action or event will automatically turn it on and turn any document that was previously marked as primary off.
Creating Beautiful Documents
It is strongly recommended that you utilize the FREE word processing program, LibreOffice, to create your custom letter document template prior to uploading it to the Document Editor. You can download LibreOffice here.
In LibreOffice, utilize these advanced styling tools to make your letter document template beautiful.
Format > Page to adjust the paper size of your document including formatting the page for legal size paper (8.5" x 14") and receipt paper (3.125" width).
Format > Page to adjust the left, right, top and bottom margins of your document.
Table > Insert Table to align replacement fields.
Format > Bullets and Numbering to create ordered lists.
Insert > Manual Break > Page to add page breaks for multipage documents.
Insert > Shapes > Line to add lines.
Insert > Image to add a logo or image.
When you have finished creating your document, save the file as a .ODT file in LibreOffice, then upload it to the Document Editor. Add replacement fields as necessary and Save your customized letter document template.
Troubleshooting
- For the best results with the Document Editor, use the Google Chrome internet browser.
- For the best results with the Document Editor, use a Windows computer.
- Preview view is not supported for Internet Explorer users. Instead, clicking the Preview tab will download a PDF document.
- If your document fails to load in the Preview tab while using Google Chrome, it is due to a problem with a replacement field. The most common problem is the brackets [[ ]] surrounding the replacement field are missing. Make sure that there are two brackets before and after the text.
- Only four actions or events may have more than one document associated with them. They are: Move Ins, Move Outs, Transfers and Delinquency. All of the other actions or events may only have one document associated with them.
- Avoid using tabs or spaces to align text. Use tables instead.
Customize template order
Once you've customized your documents templates, you may also want to customize the order that your templates appear in your software, which will subsequently change the order they appear during move-in. To change the order that templates appear, access the letter set assigned to a facility and use the arrows in the Template order column to customize their order.
Once your documents are ordered in the way you'd prefer them to be, they'll appear in this order during the documents stage of move-in.
