You are allowed an unlimited number of users with access to your Storable Edge account. Ensuring each person who uses your Edge software has unique login credentials is important, not only from a security standpoint, but from an auditing standpoint as well. For most actions taken in your account, Edge records which user was responsible for that action in the tenant or unit history.
To access your User Management settings, click the Settings tab in your Corporate Level Software.
Before creating users, you'll first create Roles. Roles are sets of permissions you give to different employees. Click Roles under User Management to access your role settings.
Preset Roles
Every account is initially set up with two roles: Owner and Minimal Access.
Owner
The Owner role has access to do everything within your software or website account.
Minimal Access
The Minimal Access role doesn't have access to your FMS or any other permissions. This role is automatically considered the Default Role and will be preselected when creating a new user.
You can change the Minimal Access Role permissions to give access to your software by default by clicking Edit.
Assign a Default role
To assign a different role as the default, click Edit next to the role. Then check the Default role box and click Save.
Creating or editing a Role
We suggest you create roles like Manager, District Manager, Accountant, etc.
- Click the Roles button under User Management.
- To create a new role, click the +New Role button. Alternatively, you can start from an existing role by clicking Copy & Edit Role and then editing the permissions. To edit an existing role, click the Edit button to the right of the role name.
- Name: The role name is typically the title of the users who will be assigned the role.
- Default role: If you check the Default Role box, the role will be preselected when creating new users. You can only have one Default Role at any time. In order to delete a Default Role, you must first assign another role as the default.
There are two tabs: FMS and Edge Website. The FMS tab is where you will find your software user permission options. FMS stands for Facility Management Software. If you also have a website with Edge , utilize the Edge Website tab to find your website user permission options.
If the role you are creating is for software users, follow these steps:
- Check the box labeled Allow access to FMS.
- Two lists of available user permissions will be displayed. The Corporate Permissions list applies to the Corporate level of your account. The Corporate level of your account is where you are right now if you are creating a role while you read this article. It is where most of your settings live. The Per-Facility Permissions list applies to the Facility level of your account.
- Check each box for the permissions you want to give this role.
- You'll select from the Per-Facility Permissions list when setting up roles for facility managers and others who should have access only to day-to-day activities.
- You'll select from the Corporate Permissions list when setting up roles for team members who need access to create users, adjust settings, run Corporate reports (reports for more than one facility), etc.
- Scroll down to the bottom of the screen and click the Create Role or Update Role button.
If the role you are creating is for website users, select the Edge Website tab, click the Allow access to Edge Website checkbox and select the permissions you want this user to have. Then scroll down to the bottom of the screen and click the Create Role button.
A single role can have access to both software and website permissions. If you are creating a role for a user who needs access to both platforms, simply select the permissions on the FMS tab, then select the permissions on the Edge Website tab, and then click the Create Role button.
Adding a New User
If your organization uses SSO, users are created and given access to your software from the SSO portal.
- Click the Users button.
- Click the +New User button.
- Name: Complete the first and last name fields.
- Login: The Login field defines whether the user will use an email address or a unique username to login. It is recommended that an email address be used but for users who do not have email addresses, a username can be used. It is best to use all lower case letters when entering either an email address or username. Note that to receive a Scheduled Report, the user must have an email address associated with their user account.
- Password: If you enter an email address in the login field, then a password will be emailed to the user after the Create User button has been clicked. If you enter a username in the login field, then two fields will be revealed where you will enter and then reenter a unique password for the user. Ensure the password is at least 8 characters long.
- Role: This field will be preselected as the Default Role. Choose the appropriate role for the user.
- Assigned Facilities: If you have more than one facility in your account, you can choose which facility or facilities this user may access.
- Click the Create User button to activate the user.
Editing a User
Once a user account has been created, you may edit the user's name, email address, username, role and assigned facilities at any time. Additional editing actions are:
Password Reset: If a user has lost their password, you may reset it for them. In the editing screen, click the Reset Password button. If the user has an email address, the password will be emailed to them. If the user does not have an email address, a new temporary password will be displayed. Communicate the new password to the user.
Deactivate User: To temporarily turn off a user's access to your Edge account, click the Deactivate User button in the editing screen. The user's status will change to Inactive and they will no longer be able to login to the account.
Reactivate User: To turn a previously deactivated user's access back on, click the Reactivate User button in the editing screen.
Terminate User: To permanently turn off a user's access to your Edge account, click the Terminate button in the editing screen. Once a user's access has been terminated, it cannot be returned to them. If they need access again, you will have to set up a new user account for them.
User Settings
Edge provides account owners the option to add a higher level of security to their account. In Corporate Settings, click on the User Settings button to establish your security rules. In this section, you'll be able to make the following choices:
Password Strength: Choose to use the more stringent requirement that passwords must contain at least one uppercase letter, one lowercase letter, one numeral, one special character, and be at least 8 characters long. Leaving this option unselected reduces the password requirement to be only 8 characters long.
Password Update Period: Choose to require that passwords must be changed after a number of days.
Password Update Type: Choose to require that new passwords must be different from the last few passwords the user has had.
Lock Accounts: Choose to lock accounts after a number of failed login attempts.
Automatically log out users after ___ hour(s) and ____ minute(s): After this setting is in place, users will automatically be logged out after the amount of time you’ve defined. For example, if you enter 2 hours, users will be logged out after 2 hours of inactivity. Please note: We recommend consulting PCI compliance guidelines to ensure your settings align with PCI compliance requirements.
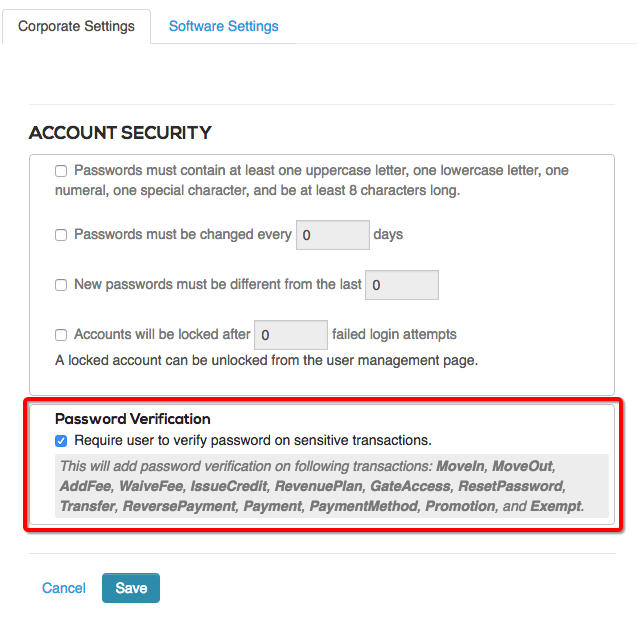
Setting Password Verification
For increased security, users have the ability to require a password to complete certain actions within the software.
Enabling password verification will prompt users to enter their password when performing the following actions:
- Move-ins
- Move-outs
- Transfers
- Adding fees
- Waiving fees
- Issuing credits
- Adjusting rental rates
- Adjusting gate access hours
- Resetting user passwords
- Reversing payments
- Applying promotions and discounts
- Setting up autopay and ACH payment methods
- Marking a tenant as tax exempt or delinquency exempt
- Editing Rentals
To enable this feature, go to the Corporate Settings and select User Settings.