This guide will help you learn more about your software's basic functions.
You'll learn more about:

Exploring the Nav Bar
You’re logged in and ready to go! But where to start? Let us give you the grand tour.
The Navigation Bar, or Nav Bar, is the black bar located at the top of your screen. On the Nav Bar, you will find some quick action buttons for your daily tasks, such as adding leads, move-ins, and taking payments. The Nav Bar is always present and locked to the top of the screen; no matter where you are within the software, you can always perform the actions available on the Nav Bar:
- Wondersearch: Located in the top left corner of your screen, the Wondersearch is one of the quickest ways to find information. Type what you’re looking for (a tenant name, lead, phone number, address, unit number, invoice number, receipt number, etc.) in the field by the magnifying glass icon. The Wondersearch will direct you to your query.
- Tenant: The Tenant button is in the upper left of your screen to the right of the Wondersearch. This button allows you to add leads, make reservations, and complete move-ins. It is denoted by a silhouette with a + icon.
- Payment: The Payment button is located to the right of the Tenant button. This button allows you to quickly take multiple forms of payment from any tenant. It is denoted by a $ icon.
- Ellipses/Three Dots: The … button is located to the right of the Payment button. This button provides a drop-down list containing four functions that open on smaller pop-up screens:
- Retail: The Retail button allows you to quickly process the sale or return of a retail item to tenants or non-tenants. It is denoted by a shopping cart icon.
- Move-Out: The Move-Out button allows you to move a tenant out by either searching for a current tenant or completing a scheduled move-out. It is denoted by an arrow icon.
- Transfer: The Transfer button allows you to search current tenants and either schedule a transfer from one unit to another or begin a transfer immediately. It is denoted by a side arrow icon.
- Close Day: The Close Day button serves to reconcile your drawer and generate a deposit report. It is denoted by a calculator icon.
- Corporate: The Corporate button is located to the far right of the Nav Bar. This button will take you to the Corporate Level, where you can edit Corporate Settings. This button is only available if you have the proper permissions to access the Corporate Level.
- Switch Facility: The Switch Facility button is located to the right of the Corporate button. This button allows you to access other facilities within the company. It is only available to users who have been given permission in their account settings to access multiple facilities. It is denoted by a double arrow icon.
- Account Settings: The Account Settings button, located to the right of the Switch Facility button, displays the your initials. This button allows you to change your password or log out of Storable Edge so that another user may log in.
Using tabs
Tabs allow you to see more detailed information about your facility and your tenants. All of the tabs are located on the left side of the screen:
- Dash: The Dash Tab, short for Dashboard, displays month-to-date graphs and charts related to facility management. This tab also shows any recent lead or unit activity as well as recent phone calls to your tracked phone line. It is denoted by a star within a circle icon.
- Leads: The Leads Tab displays all leads whether they were manually entered by a user, came in from your website, or were added from a 3rd party source. It is denoted by a plot graph icon.
- Tenants: The Tenants Tab displays lists of both current and past tenants. The tab will quickly let you access your individual tenant profiles for complete tenant details. It is denoted by a silhouette icon.
- Units: The Unit Tab displays color-coded lists of all your units or your facility map. It is denoted by a storage door icon.
- Billing: The Billing Tab allows you to see all invoices and payments and manage failed autopayments. It is denoted by a large $ icon.
- Past Due: The Past Due Tab shows a list of all of your past due or delinquent tenants and allows you to complete delinquency actions. It is denoted by an alarm clock icon.
- Reports: The Reports Tab houses all of the facility level reports available in the system. It is denoted by a pie chart icon.
- Yield Mgmt: The Yield Management Tab allows you to set up rate management plans for occupied or unoccupied units. It is denoted by a line graph icon.
- Communications: The Communications Tab is where you’ll find lists of all your communications (phone calls, emails, text messages, etc.) with your customers. It is denoted by an envelope and cell phone icon.
- Settings: The Settings Tab contains the various settings that affect your facility and tenants, i.e. delinquency stages, retail items, etc. It is denoted by a gear tab.
Getting things done with the Task List
The Task List is accessible by clicking on the tab at the far right of your screen. Click the task list icon to slide open a sidebar of your tasks. This tab is always visible, no matter where you are in the system.
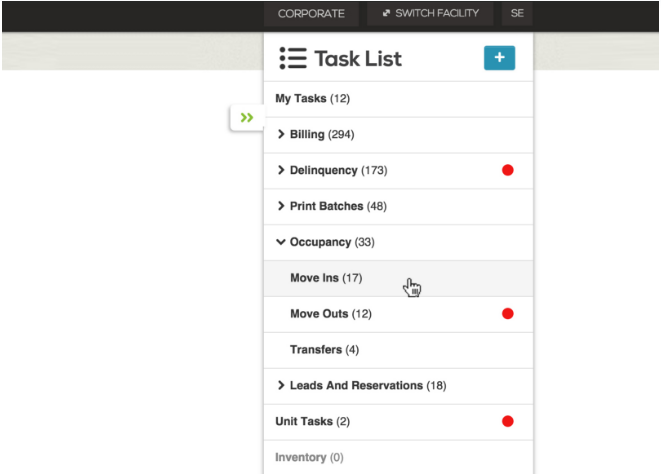
This is a great way to keep track of your daily tasks. Tasks are divided into categories making it easy to see what needs to be accomplished
Tasks can be added manually or in most cases will automatically be generated by the system.
More resources for new users
We have even more resources for you. Check out these featured articles for new users:
- Facility Map (Builder)
- The Rental Center™ - Customer View
- Learn more about performing daily operational functions